Please Note: I am reposting this article from my iphoneraw.com site which has been set up for my new iPhoneography book series and to cover all things iPhoneography related, check out the site if you're an iPhone shooter, there are already many articles there not posted on this blog site.
A few weeks back I ran some tests on the RAW files taken with the latest iPad Pro, you can read about that here.
Frankly, I was pretty impressed, the quality was indeed considerably better than what’s possible on my “soon to be replaced iPhone 6S plus”. Those test results got me quite excited because I fully expected to find the DNGs produced by the new iPhone 8S Plus would be a small step further step up the quality ladder.
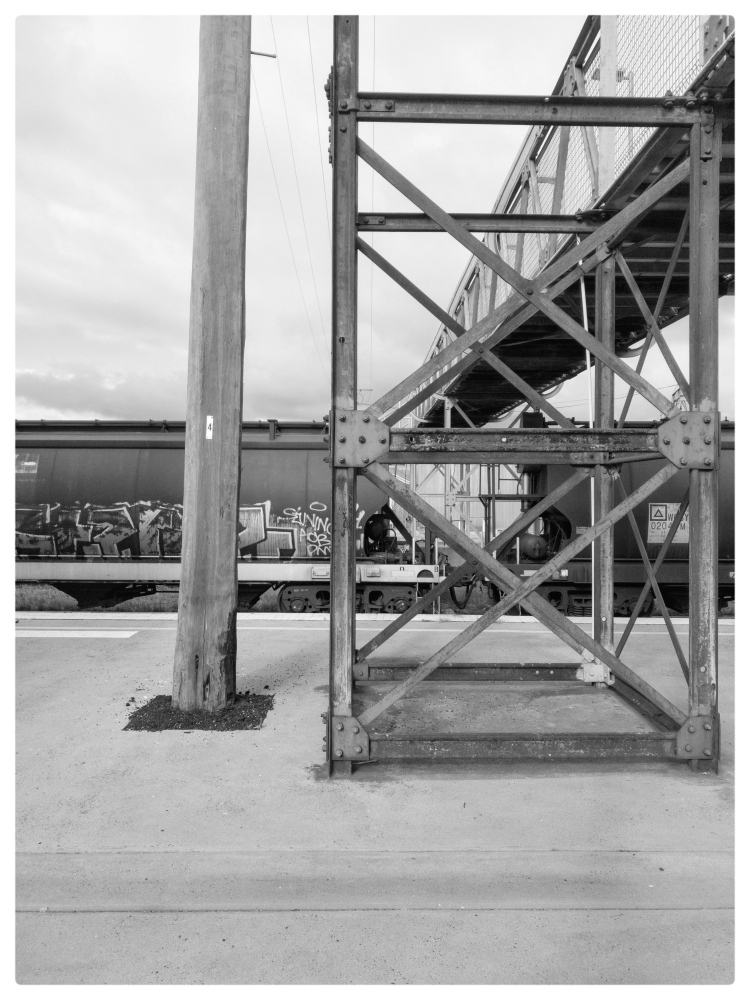
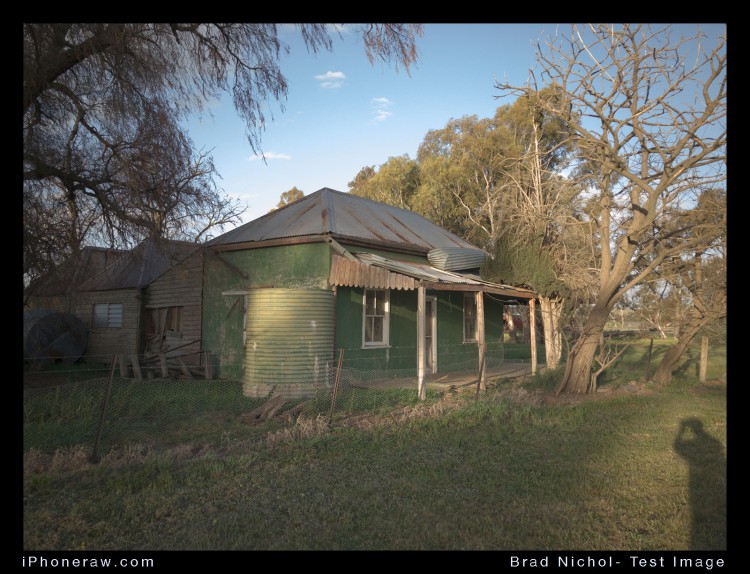
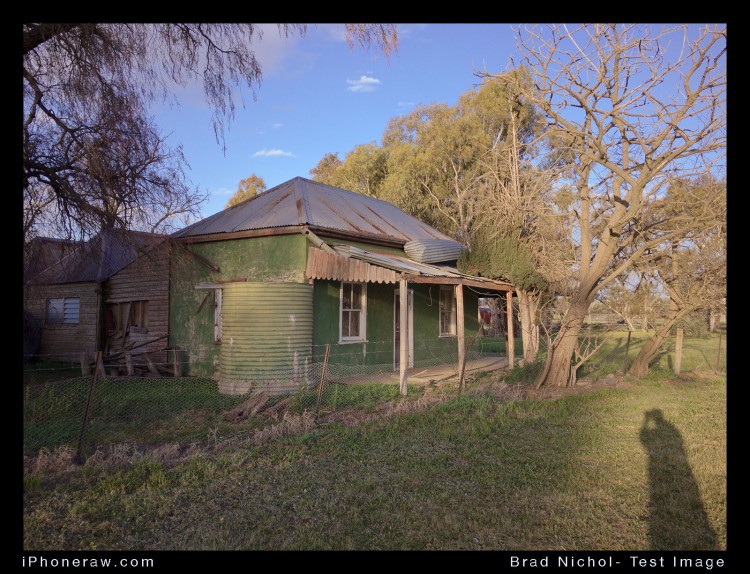
As far as I can tell the modules on the iPad Pro and iPhone 8S plus are pretty similar, save for the lack of stabilisation on the iPad, but like all things Apple it can be quite difficult to get any definitive answers on what’s going on under the hood. Anyhow, I’d have been happy if the iPhone 8 Plus DNG files were as good as the iPad Pro since it seems they’re actually a bit better I’m pretty chuffed. For comparison the shot below is one of the test images I took with the iPad Pro converted to monochrome, the overall quality is rather nice.
And so here we are just a few days after the iPhone 8 release with a peek beneath the DNG hood. Up front consider this as a preliminary test, it’s my wife’s’ iPhone and it only arrived Friday morning, so my time with it was a very limited, basically an hour or so on Sunday afternoon. Frankly dragging any new Apple device from Wendy’s’ hot hands when she’s in the first blush of Apple love is harder than getting our Border Collie to give up a bone. But Wendy is a lovely lady and terrific wife agreed to let me have a little free time with her new 8S Plus baby.
Note also, I only tested with the wide angle lens, not the telephoto, there’s no point comparing apples to oranges and then coming up with grapes, the 6S Plus has no telephoto lens option.
You still can’t shoot DNGs using the standard iPhone camera app, I imagine Apple decided the great majority of iPhone shooters will just want to deal with compressed finished JPEGs, except of course they’re not JPEGs anymore but rather the new HEIF and a big hooray for that. It’s certainly long past time when that clunky, chunky old JPEG format needed to be replaced with something much more modern.
If you want to know about the HEIF format here is a link for you to check out.
This review is not about the fancy schmancy modes that the standard app offers, you’ll find plenty of info in other places if you want to know the ins and outs of the portrait mode or that cool photo lighting mode, suffice to say I reckon they are pretty cool. Wendy gave those headline features a big workout over the weekend with our 8-month-old Grandson Milton and apart from having a lot of fun she found the results were actually pretty good most of the time.
This test is just about the potential of this DNG files but later I intend to explore the other options in depth, once I get my own iPhone X in a couple of months.
I actually think the iPhone 8 Plus DNG files have more relevance to the new iPhones that the previous versions because the general capabilities of the new cameras are much better all round. Now that might sound an odd thing to say since traditionally we shoot RAW/DNG to overcome the limitations of JPEG capture but bear with me. I reckon a lot more people are going to choose the iPhone as their only camera, I can easily see DSLRs and Mirrorless cameras being left behind sulking in cupboards whilst owners pop off for two weeks of R and R. That improved shallow depth of field effect will be enough to sway the choice for many casual and semi-serious users, most folk care little about how the result is achieved and just love the fact it can be done at all, much to the chagrin of many old-school shooters.
I can also imagine a lot of folk will still take their DSLRs on holidays and then faced with the choice of carting the gear around some foreign city for a day will decide…nah….leave it in the motel room, I’ll just slip the iPhone into my pocket. Next holiday the DSLR won’t even make it to the front door!
Think about that for a moment, iPhone pics have been fine for many needs for years now but the new features and HEIF format raise the bar to a point where many more photographers will see the iPhone as “perfectly sufficient”. What else out there combines lighting effects, great panorama modes, synthetic depth of field, slow-mo, great 4K video, time-lapse, perfect connectivity etc in the regular camera world…anybody…cmon…and of course you can shoot pretty good DNGs as well if you want an imaging edge.
At times more serious users will certainly want the wholesome goodness and flexibility that DNG capture offers, which brings us back to the question at hand, just how good or bad are the iPhone 8 Plus DNGs.
Whilst the following test pics are not fully comprehensive and nor are they great works of art, (but then what can you do when you only have the device for an hour or so), I reckon they give a pretty solid insight into the iPhone 8S Plus DNG option and its potential.
I always test with everything locked down with optimal exposure and focus control, I think when we test we should test “exactly” what we say we are testing, which means we need to eliminate the variables as much as possible. You can be pretty confident these pics are a valid representation of what you can expect from the DNG files if you take care shooting and spend some time doing proper edits.
As for the shooting, I use and recommend two applications, Lightroom Mobile and ProCamera, (both of which are covered in detail in my iBook “Ultimate iPhone DNG”, available on the iBooks store) between these two apps you can do pretty much anything you’d reasonably expect to be able to do when shooting with DNG on your iPhone.
The exposures were optimal and some were captured using a UNiWb method on both the iPhone 6S Plus and 8S Plus, read the book if you want to know about that.
The editing? I edited them in three applications, first Lightroom Mobile to get an insight into what’s possible by using only the Raw converter on the iPhone and then I carried out some post DNG tuning in the new version of Snapseed (which is very nice by the way). On the Mac, I used Iridient Developer, followed by some Photoshop CC time to check for iPhone DNG edit-ability.
Just so you know, nothing extracts detail from files like Iridient does, it represents the ultimate and additionally, there are an absolute plethora of ways the files can be processed within the application, including alternative noise reduction and sharpening methods. I came up with a few workflows for the files based on what I’ve done in the past with iPhone DNGs, these worked a treat but it’s worth adding that given some serious exploration time I can probably get more a little more out of the DNGs using more refined workflows.
My general principle with Iridient is to render out a result that can be fine-tuned in Photoshop. Some folk might say my approach is not relevant to them, well maybe true, but they can always use Lightroom Mobile. On the other hand if like me you really want to know what the iPhone 8S Plus DNG limits are then this is the way to do it.
You’ll find I refer to the iPhone 6S Plus as a comparison, I think that’s totally valid as most people buy their iPhones on two-year contracts or keep them for the two-year period, meaning the most likely customers for the new 8 series iPhones will be the 6 Series updaters who’ve skipped the 7 series models.
Alrighty, let’s get down to it….

Angle of View
The focal length of the lens on the 8S plus is slightly shorter than the 6S Plus, I assume the actual sensor dimensions are the same, (Maybe not, I haven’t been able to track down a definitive answer). From the comparison pics, it looks like the 8S Plus has a slightly wider angle of view but I’d need to lock both down on a tripod and shoot them side by side to be sure.
The 6S lens was 29 mm equivalent and I’d say the 8S is 27.5 equivalent or so but I’ll confirm this with future tests.
Depth of Field
Whilst the difference is not much the wider aperture on the 8S does seem to give slightly more separation when you shoot scenes that include near and distant objects, this is to be expected of course but it looks a little more pronounced than I had anticipated.
I assume that the higher level of overall lens/sensor performance in all measurable parameters is more important in changing that apparent depth of field rendering than the wider aperture. Basically slightly out of focus areas always look more out of focus if the in-focus areas are rendered truly sharply in comparison, which they are with the 8S camera module.
Distortion
The distortion characteristics of the 8S Plus are benign, that is to say, I couldn’t see any change when I turned the lens correction on/off in Lightroom Mobile, even in Iridient Developer I couldn’t really see any distortion in the uncorrected files.
I’d need to run further tests on a tripod with fixed straight edged subjects to say with conviction that there’s no distortion but at this point that looks to be the case, which is quite impressive.
Compared to the 6S Plus
The 6 series modules have some pincushion distortion which in uncorrected files is just visible, so a win to the 8S plus, I’m just not sure by exactly how much.
Colour
With Raw files the colour rendering is mainly a product of the choices you make when extracting the files, the white balance, tint, saturation and vibrance are all adjustable but it’s also true that the sensor design and the processing chain will have an effect on how the final files respond.
Of all the criteria this is the hardest to qualify, I think Lightroom Mobile produces lovely colour with the 8S Plus but it’s pretty terrific on the 6S Plus files as well.
Colour can be fine-tuned in RAW converters or photo editors in post and the rendering of colours is not baked into DNG/RAW files in the way it is with compressed formats, at best I can make a couple of comments as to how the files look and responded when edited.
If anything the yellows are a little more dominant than ideal and blues are slightly cyan shifted, greens can end up a little yellow/green. All colours seem to accept selective editing really well and fine-tuning white balance is very easy. Really I’d need an opportunity to shot a wide array of shots including portraits and indoor lighting plus colour checker images to be able to make any meaningful judgement.
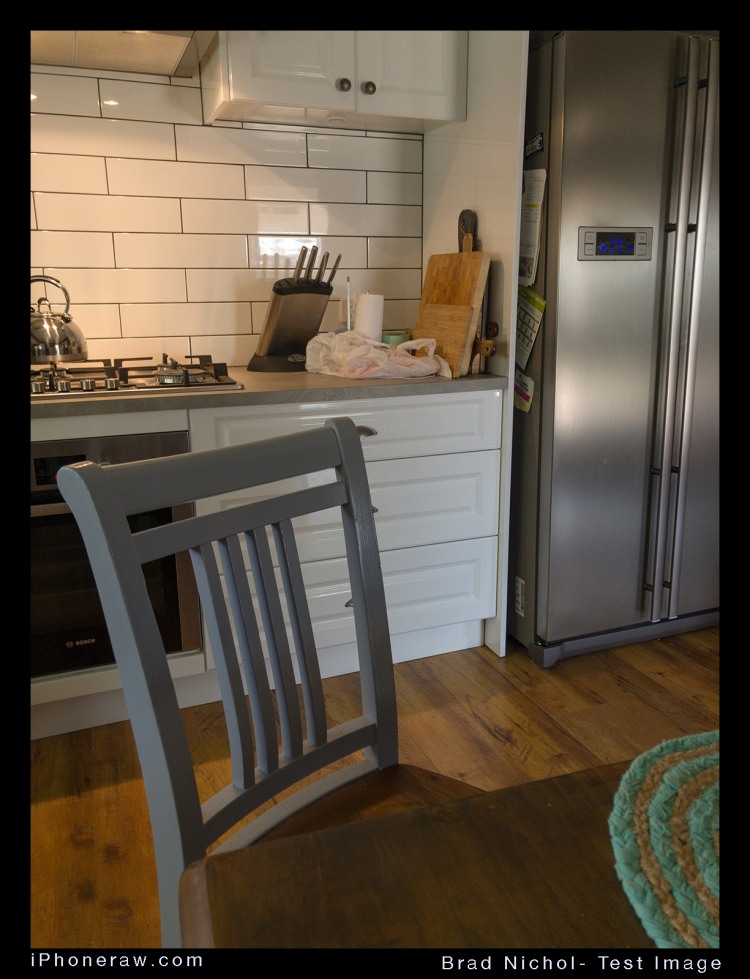
I did try a mixed lighting shot in my Daughters kitchen that had filtered window light and tungsten and overall the resulting image looked rather good, in other words, the tungsten lit elements were warm but controlled and the window lit areas not overly blue. Generally, the result was much better than what I saw with the 6S Plus.
Compared to the iPhone 6S
The 8S Plus seems to be a little less prone to accentuating certain colours, basically, it’s easy to get neutrals looking neutral and artificial light sources don’t seem to cause “runaway” colour tints. I’d judge the 8S an improvement but I need to investigate further.
Noise
I expected the noise levels would be reduced compared to the iPhone 6S Plus as the 7 series modules produce RAW files that are definitely better in this regard.
So what did I find, no competition here at all?
For those shooting in the standard camera format, JPEG and now HEIF, noise is usually a non-issue as the iPhone processing pretty much blurs all the noise away along with the fine detail. On the other hand with DNGs we have total control and can play the trade-offs against one another, that alone could be reason enough to shoot DNG.
The 8S Plus DNG noise is much lower than the older modules and especially the 6 series, you can see it everywhere in the image, but it’s especially obvious in blue skies and shadows. If the file is correctly exposed at the lowest ISO (as a RAW file, not as if it were a compressed processed file) you can turn off all noise reduction in Iridient, no qualms at all.
Initially when noise appears its low-level chrominance noise showing up in neutral toned areas, but I found it to be very acceptable at the low test ISOs and there’s almost zero luminance noise in smooth tones areas if the file is optimally exposed, i.e., at 20 ISO.
Compared to the iPhone 6S
No contest, the 8S Plus easily bests the 6S plus and importantly this means you can push the sharpening and micro tonal contrast adjustments more aggressively.


Detail
The DNG files from the 6S plus are vastly better than the JPEGs, the JPEGs always show unpredictable mushiness, lack of very fine detail and sometimes look very watercolour like. I expected the new HEIF format would be much less damaging to the files and thus the difference between DNG and compressed capture under normal shooting would not be as significant. So how did that assumption pan out?
Well, although not covered in this test, I did look at the compressed standard files and there’s no doubt they hold much better fine detail than the old mushy JPEGs on the 6S Plus, there’s far less of that watercolour rubbish I detest.
Frankly, I was not expecting a big improvement in detail rendition with the DNG files on the 8S Plus, the 6S DNGs were already capable of very well resolved results providing the exposure was nailed correctly. DNGs converted in Iridient extract about as much detail as you could ever reasonably expect from any 12-megapixel image. So are the 8S Plus better? In the centre of the frame it’s a pretty close call, the native files showed little difference in detail but the win goes to the 8S Plus…just.
But, there is much more to it, the 8S Plus shows a higher level of clarity across the entire frame because the lens is simply better and more importantly the native noise level are much lower, meaning you can apply correspondingly higher levels of image sharpening without the noise becoming obvious and degrading the image.
The lower noise level pays off, particularly when applying very low radius sharpening to bring out textural details. With earlier models, you really had to back off early as you’d get a combination of ugly colour flecking and rough grain. The 8S Plus files beg to be texture sharpened and respond really well to it.
Compared to the iPhone 6S
Better, but not a chalk and cheese difference, in the end, you have more sharpening flexibility with the new camera, that will be a big bonus for those wanting to crop the frames or blow up to larger sizes, in particular, the improvements in the corners of the frame are obvious.
Dynamic Range
The Raw files on the iPhone 6S Plus have considerably better dynamic range compared with the JPEGs, especially if they are captured using optimal UniWB exposure, (read about that in “Ultimate iPhone DNG). I’ve always felt iPhone DNGs did a much better job with the highlight end than the shadows, which despite all sensible efforts usually still ended up lacking good detail and tonality. Ultimately highlights are far more important than shadows so it was a fair trade-off, but now I don’t have to trade anything…cool!
I really need to run some comprehensive tests on this but I’m confident the iPhone 8S Plus will provide details with better highlights and much-improved shadow detail under almost all conditions. It boils down to this, even if the true dynamic range was no wider, (and I think it is) the shadows have far less noise and record more recoverable detail than the 6S Plus ever did meaning for DNG captures you can reduce the exposure to protect the highlights more, knowing you’ll be able to brighten the image in post without it turning it into an ugly noise-fest.
The 8S plus will still clip highlights, it is a small sensor after all, but I noticed that the highlight the recovery tools in Iridient worked a little better with the 8S files, tending to give a more neutral colour rendering and avoiding the harsh tonal breakup I’m used to seeing with clipped 6S Plus files.
Compared to the iPhone 6S
The 8S Plus is better but probably mainly due to the lower shadow noise levels. Neither device is going to be as flexible as a regular DSLR or Mirrorless cameras but if you’ve only ever shot JPEGs on a smartphone you’ll be quite amazed at how good these DNG files can be.
Lens Quality
I thought the lens quality of the 6S Plus was pretty good though mine at least would sometimes render corners randomly soft, it might be the top right in one shot, bottom left in another and so on. I suspect this is due to weird interactions with the 6S Plus image stabilisation but I’ve never been able to conclusively prove that. Generally, the 6S Plus edges and corners are noticeably less well resolving than the centre.
The iPad Pro lens with its 7 series camera module is much better performing than the 6S Plus, this might be due to less diffraction as a result of the wider aperture or it could just be a better design, regardless the lens on the iPad Pro eats the 6S Plus for dinner, resolving very well across the entire image and my iPad Pro doesn’t show any uneven corner softness at all.
It makes more sense, in this case, to compare the lens performance of the 8 series to the 7 series module as it’s a given the 8S Plus will easily best the 6S Plus version.
So the answer? The DNG files look to have a little bit better edge definition on the iPhone 8S Plus when compared to the 7 series modules. Like most lenses the corners aren’t exactly equal in resolution, the bottom left is the softest on the test sample, but honestly, it’s still very very good. Let me put it this way, the cross frame performance is much better than any kit lenses I’ve ever tested on DSLRs or Mirrorless cameras when set at the wider end of the range, you certainly don’t look at the 8S Plus DNGs and think, “damn I wish that corner was sharper”.
Compared to the iPhone 6S
The improved corner definition compared to my 6S Plus is very obvious, especially when you look at the DNG files in their native state, no competition here, a knockout for the 8S plus and it looks a bit better than the 7 series modules as well, but this could be down to other processing chain factors rather than optics.
Chromatic Aberration
Just so we a clear, we’re talking about magenta/green and yellow/blue colour fringing here, not the purple fringing you can see around dark lines set against bright light sources, the later is not regular CA and has a different cause.
I’m very sensitive to CA, I find it visually disturbing and even little bit of CA gets me queasy. CA messes with the colour as you move towards the edges and corners of the frame and also reduces peak sharpness. Most photographers will argue, “yeah but it can be fixed in post”, that’s true but a CA fixed image will never be as sharp as one created with a lens that exhibited no CA at all. Give me optically corrected CA any day.
Now up front, I have to say those iPhone lenses since the 5S have been pretty good in this regard, each iteration seems to have reduced CA a bit and but frankly, it’s never the bothersome issue it is on most regular camera lenses (even expensive ones).
And now, I present with great fanfare…tadaa….the first lens I have ever tested where I could not actually find any Chromatic Aberration when zoomed into a 200% view on an uncorrected RAW/DNG file. Just pause for a second and ponder that, I said none, nada, nothing.
Yes, you’ll get a little purple fringing if you push the exposure hard enough but that’s a horse of an entirely different colour, literally, regardless the purple fringing is really well controlled, basically a non-issue, all of which tells me the lens must have pretty high native contrast, excellent coatings and superb design.
Anyhow folks, you can forget about worrying about chromatic aberration and also be confident that any residual purple fringing when it shows up can easily be sorted in the RAW converter or Photoshop (or something similar) with a fringing correction tool. Lightroom on the desktop computer does a great job of sorting this for example.
Compared to the iPhone 6S Plus
The 6S Plus always performed well in this area, but zoomed in the 8S Plus is much better, in particular, the high contrast purple fringing is not as well controlled on the 6S Plus.
Just One Thought
Killing chromatic aberration with lens design is very difficult for a whole array of tech reasons, most kit lenses don’t even get close to sorting the CA within the lens itself, that’s done in software when making the JPEG or via a profile in the RAW converter.
I checked the DNG files without any corrections enabled and found zero CA, this raises a question I can’t answer. Have Apple found some way to perfectly correct the CA before the DNG file is written and bypassed profile corrections in the RAW converter later on or is it just the lens is incredibly well corrected for CA? I don’t know but the results are great.
Colour Banding
Colour banding has been a real bugbear of mine with iPhone images since the first iPhone I owned, a 3GS. I hate it banding, loathe it, detest it, I don’t like it and it makes me want to throw up, well not quite…. but you get the idea. Banding is also devilishly hard to correct in post editing without causing other flow-on problems.
Banding or posterization particularly show up in blue skies and on bright skin tones, but it’s also common on yellow objects with many cameras including iPhones. What complicates the matter is that some of the visual banding in the past was not due to issues with the files and inadequate bit depth but rather the display panel. I often found apparently banded images were quite OK when extracted and viewed on my desktop 5K Mac.
The iPhone 8S Plus has a much better display, not as good as the X promises but still much better than the 6S Plus, in fact as soon as you look at the images on the iPhone 8S Plus it’s obvious the display is way better so I expect that that display induced banding will cease to be an annoyance.
It’s a bit early for me to pass a definitive judgement, I really need the chance to shoot a lot more photos with large areas of blue sky, yellow cars, portraits in bright light etc to be sure….but it certainly looks like the banding issues are significantly reduced or eliminated. None of the quick test pics showed any tendency towards banding and breakup no matter how hard I looked or pushed them in editing!
Compared to the iPhone 6S Plus
Again its hard to be sure but the DNG performance looks to be much better, the real test will be when I can get the phone back off my wife later this week and torture test for banding using Lightroom Mobile HDR feature, I’m quietly confident that the “banding is on the run”, both for the files and the display! BTW its pretty easy to get the “bands” when pushing 6S Plus files in editing.
Vignetting
All iPhone/iPad raw/dng files I’ve tested have shown red tinted vignetting in the native state. JPEG shooters are likely unaware of this as the standard processing deals with it automatically, most Raw converters also deal with the worst of the issue via a built-in profile but sometimes you still see it in skies and smooth tones areas near the edges of the frame.
The red/vignetting shift is mainly caused by issues within the sensors design and the way it interacts with the lens, it’s diabolically tricky to eliminate the issue if present. In the case of past iPhones, the red shift in the DNG files became much worse as the ISO was raised.
The truth of the vignetting matter is revealed by taking DNG files and viewing them with all profile adjustments turned off, you can’t do this on the iPhone nor is it possible with many desktop editing apps but it’s easily done in Iridient Developer.
Does it matter? Absolutely, that vignetting not only causes colour shifts in the corners but increases the noise levels, reduces corner shadow detail and limits your ability to get the best possible results from the files. For example, you’d need to dial back the sharpening levels and increase the noise reduction if you don’t want messy corners and edges, it also means you need to perform advanced radial edits to get the most out from your DNGs. Red shifted vignetting might not be a big issue to many of you out there in interweb land but to me, it’s massive PIA.
So….the iPhone 8S Plus has much less native corner vignetting than the 6S plus models and a little less than the 7 series modules as well, additionally the vignetting is far more colour neutral, there’s a very slight colour shift but nothing like the horrible red shift on previous models and it’s only seen on plain blue skies if at all. With the 6S module, you could see it on every uncorrected frame and it even ran well in towards the centre of the image if the ISO was raised just a bit.
Response to Editing
This is where the rubber hits the road for DNG files, JPEGs are just so damned brittle, push the tones and colours or try to re-sharpen and all sorts of nasty things happen, I haven’t tested the HEIF files for edibility but the specs of the format tell me it should be pretty flexible.
The 8S Plus files edit very well in both Lightroom Mobile and on the computer in Iridient Developer. Shadows can be pushed, highlights recovered and selective edits applied without getting horrible tonal breakup. The files can be sharpened easily and the noise being much lower means you have greatly improved options for shadow recovery.
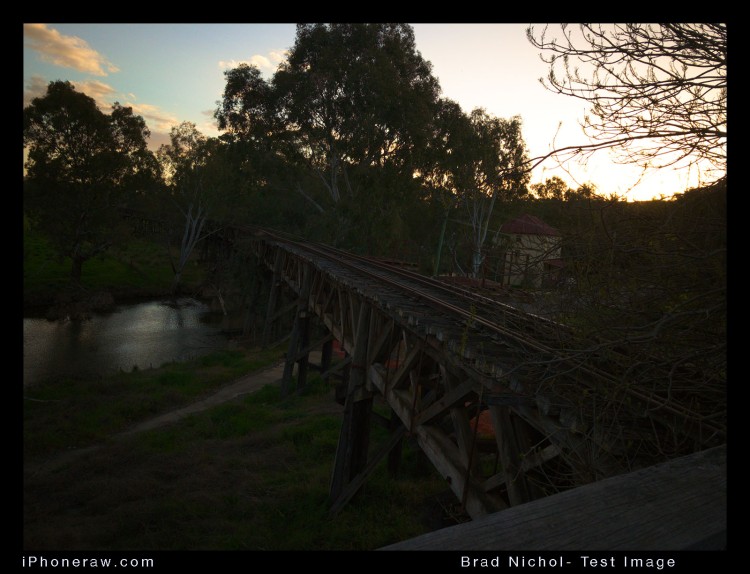
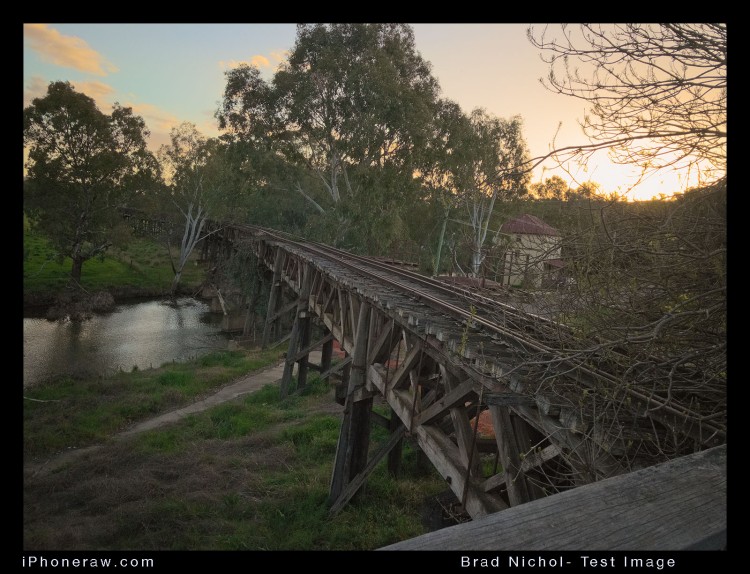
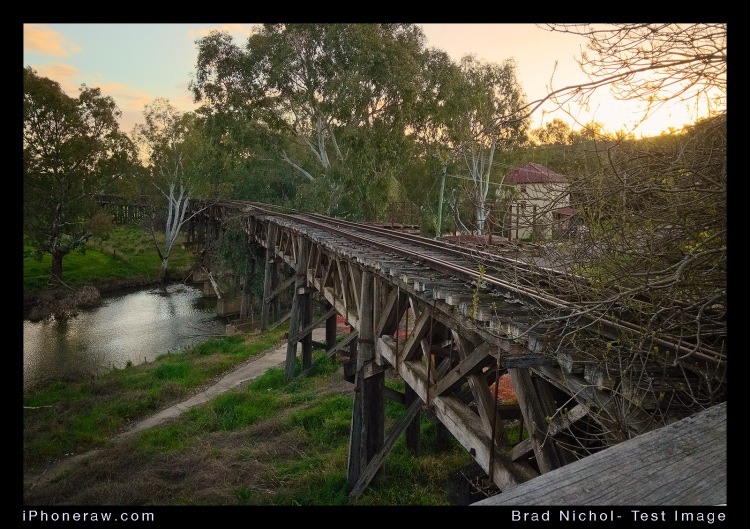
As a little test, I shot an image along an old railway bridge in Gundagai NSW after sunset, it’s an extremely contrasty lighting situation and the phone wasn’t level either as I was shooting through a crooked wire fence.
Looking at the original DNG capture you could easily decide all is lost, it looks hopelessly dark and honestly if this were a DNG shot on the 6S Plus there’d be no hope, but take a look at the recovered edited and cropped image, it actually looks pretty reasonable.
The processing was done via a combo of Iridient Developer and Photoshop CC, yes it has some luminosity noise but truly it’s far better than I expected.

Compared to the iPhone 6S Plus
Not even in the same ballpark. Net result then, the 8S Plus DNG files edit better period!
Where to From Here?
This is just the first in what will be a full battery of tests on the DNG, some of it will likely make its way into an update of my “Ultimate iPhone DNG” eBook.
So next I will explore the performance at the various ISO settings, try out the telephoto lens for DNG, run some comprehensive DNG colour tests, try different sharpening and noise reduction processes in Iridient, run some HDRs in Lightroom Mobile and probably a few other things as well.
Late Addition
I was asked about the quality of the edited Torture test file as a 100% view, I have added the 2 crops below, they are roughly a 100% view, probably a bit more so when viewing on most devices. The detail obtained from this hopelessly underexposed file is quite amazing, I can assure you the 6S Plus is no where near as flexible as this. Look back at the original and take a peek at the building, my guess is you would have no idea that any of the detail below is present in the un-edited file.


Do come back again and if you really want to get the most out of your DNG captures on your iDevices why not pop on over to the iBooks store and buy a copy of my 400 page “Ultimate iPhone DNG”.
Cheers
Brad
Posted in iPhone RAW, iPhoneography
lways clear and concise, you are a natural teacher! Great
ReplyDeleteiPhone photography